Transforming a lifeless form into a lifelike tribute requires meticulous attention to detail. Perfecting taxidermy goes beyond the initial mount; it’s in the subtle nuances that true artistry shines. This guide delves into seven crucial finishing touches, elevating your taxidermy from good to exceptional. From crafting realistic eyes that capture a creature’s essence to meticulously grooming fur and refining facial features, we’ll explore techniques that will transform your work.
Mastering these details involves a blend of artistic skill and technical precision. We’ll cover essential steps, offering practical advice and insights to help you achieve stunning realism. Whether you’re a seasoned taxidermist seeking to refine your skills or a newcomer eager to learn, this guide provides valuable knowledge to enhance your craft.
Eye Detailing and Placement

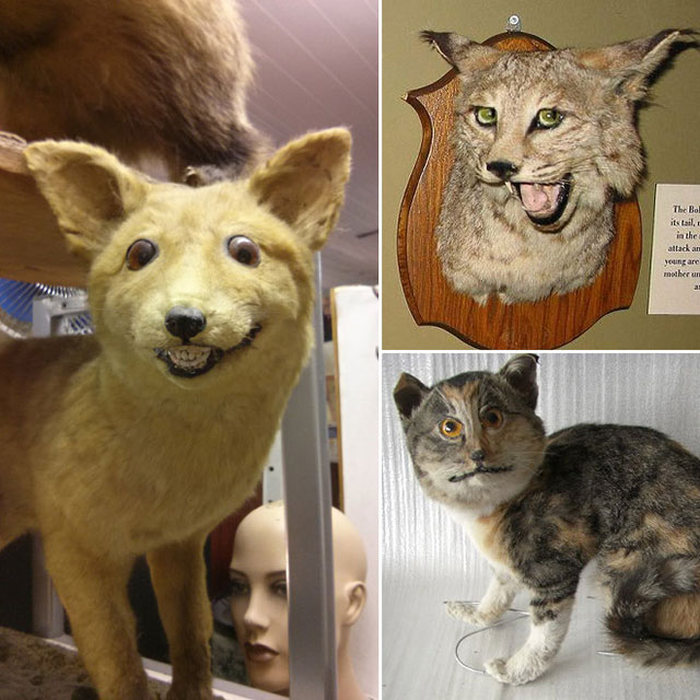
Realistic eyes are paramount in achieving a lifelike taxidermy mount. The eyes are often the first thing a viewer notices, and their quality significantly impacts the overall realism and artistry of the piece. Proper eye selection, placement, and setting are crucial steps in the finishing process.
The creation of realistic taxidermy eyes involves careful material selection and precise painting techniques. Several materials are available, each with its own advantages and disadvantages. The process begins with choosing eyes that accurately reflect the size, shape, and color of the animal being mounted. Pre-made glass or plastic eyes are commonly used, offering a range of colors and sizes. These can then be further customized through painting to achieve a more natural look. This often involves layering different shades of paint to create depth and highlight the iris and pupil. For instance, a subtle application of lighter paint around the pupil can simulate a highlight, adding significant realism. Fine-tipped brushes and high-quality acrylic paints are essential tools for this process.
Eye Material Comparison
The choice of eye material significantly impacts the final appearance and longevity of the mount. Below is a comparison of common materials:
| Material | Pros | Cons | Cost |
|---|---|---|---|
| Glass Eyes | Highly realistic, durable, and excellent clarity. | More expensive, can be fragile during installation. | High |
| Plastic Eyes | Affordable, readily available in various colors and sizes. | Can appear less lifelike than glass eyes, prone to scratching. | Low |
| Custom-Painted Eyes | Allows for precise color matching and unique detailing. | Requires artistic skill and time investment. | Moderate to High |
| Concave Eyes | Creates a more natural-looking eye socket depth, particularly useful for certain species. | More difficult to install properly. | Moderate |
Eye Placement and Setting
Accurate eye placement is critical for achieving a natural and lifelike expression. The eyes should be positioned symmetrically and at the correct distance apart, following the anatomical guidelines specific to the animal species. Before setting the eyes, it’s crucial to carefully assess the animal’s skull and determine the correct position based on reference photos or anatomical diagrams. Improper placement can drastically alter the animal’s expression, making it appear unnatural or even distorted.
The process of setting the eyes involves carefully inserting them into the eye sockets. This often requires using a small amount of adhesive, such as epoxy or a specialized taxidermy adhesive, to secure them in place. The adhesive should be applied sparingly to avoid excess material that could be visible or interfere with the eye’s placement. It’s essential to ensure the eyes are set at the correct depth within the socket to maintain a natural appearance. This might involve using small amounts of filler material to adjust the depth if necessary. Finally, once the eyes are set, it is important to allow the adhesive to cure completely before proceeding with further finishing touches. Using a small tool or toothpick to ensure the eye is properly seated and to remove any excess adhesive is often helpful. The eyes should be aligned to avoid any asymmetry.
Fur and Hair Manipulation

Achieving a lifelike appearance in taxidermy hinges significantly on the meticulous manipulation of fur and hair. Proper grooming and styling are crucial for creating a realistic and aesthetically pleasing final product, mimicking the animal’s natural texture and flow. This section will detail techniques for achieving this, addressing common challenges and providing a step-by-step guide for creating a natural hairline and whisker placement.
Proper grooming and styling techniques are essential for creating a natural look in taxidermy. These techniques involve a careful combination of brushing, combing, and texturing methods to restore and enhance the animal’s original coat. Addressing common problems like matting and bald spots requires patience and the right tools. The goal is to recreate the animal’s unique hair pattern and texture, adding depth and realism to the final piece.
Addressing Matting, Tangling, and Bald Spots
Matted or tangled fur significantly detracts from the finished piece. Begin by gently teasing apart the matted areas using a fine-toothed comb or a specialized taxidermy grooming tool. Work slowly and patiently, avoiding pulling or ripping the fur. For severely matted areas, a diluted solution of mild detergent and water can help loosen the mats. Rinse thoroughly and allow the fur to air dry completely. For bald spots, consider using specialized hair replacement techniques, carefully selecting fibers that match the animal’s original coat in color and texture. The goal is to seamlessly integrate the replacement hair, creating a natural appearance. Careful blending is key to preventing noticeable patching.
Restoring Natural Hair Patterns
Restoring natural hair patterns involves understanding the animal’s unique coat characteristics. Observe reference photos of the species to understand the direction and pattern of the hair growth. Use a soft brush or comb to gently coax the fur into its natural alignment. For areas with disrupted patterns, carefully use your fingers to manipulate individual hairs, creating a more natural look. This process requires patience and a keen eye for detail. Consider using a small amount of hair setting spray to help hold the hair in place once the desired pattern is achieved.
Creating a Realistic Hairline and Whisker Placement
Creating a realistic hairline involves meticulous attention to detail. Begin by carefully sculpting the skin around the hairline, ensuring a smooth and natural transition between the skin and the fur. Gently brush the fur towards the hairline, creating a soft and gradual transition. For areas where the hairline is sparse, consider using specialized hair replacement techniques to add density. Pay attention to the subtle variations in hair length and direction to achieve a lifelike appearance.
Whisker placement is equally important. Use tweezers or a fine-tipped needle to carefully position individual whiskers, ensuring that they are correctly aligned with the animal’s natural growth pattern. Vary the lengths and angles of the whiskers to add depth and realism. Avoid creating a perfectly symmetrical look; slight asymmetry contributes to a more natural appearance. The whiskers should appear naturally spaced and slightly disheveled, not rigidly aligned.
Finishing Touches
The final stages of taxidermy are crucial for achieving a truly lifelike representation of the animal. Careful attention to detail in the mouth, nose, and claws elevates the piece from good to exceptional. These features, often overlooked, significantly impact the overall realism and artistic merit of the finished product. The following sections will guide you through the techniques for perfecting these subtle yet important aspects.
Mouth, Nose, and Claw Refinement
Creating a convincing mouth involves a delicate balance of form and color. The lips should be subtly shaped to reflect the animal’s natural expression, avoiding overly rigid or unnatural lines. Careful consideration of the species-specific lip structure is essential. The teeth, if visible, require precise placement and painting to avoid a cartoonish effect. Finally, the tongue, if included, should be carefully sculpted and colored to match the animal’s natural pigmentation.
- Lip Color Application: Start with a base coat of a pale, flesh-toned color. Then, use progressively darker shades to create depth and shadow, mimicking the natural variations in lip color. A fine brush is essential for achieving precise application.
- Tooth Detailing: Use a very fine brush and acrylic paints to carefully paint each tooth, paying attention to the subtle variations in color and shape. Consider using a glaze to create a semi-transparent effect, mimicking the natural translucency of teeth.
- Tongue Sculpting and Painting: If the tongue is visible, ensure it is properly shaped and positioned within the mouth. Use a flesh-toned base and gradually add darker shades to the sides and base to create depth and realism. A subtle gloss can enhance the wet appearance of a tongue.
Refining the nose involves addressing any asymmetries and ensuring natural coloration. The nose should be meticulously sculpted to match the species’ specific shape and size. Careful attention should be paid to the nostrils, which should be appropriately sized and shaped to allow for realistic air intake. Coloration should mimic the natural variations in pigmentation, avoiding overly uniform or artificial-looking tones.
Creating realistic claws requires careful shaping, painting, and setting. The claws should be meticulously sculpted to match the species’ specific size, shape, and curvature. Once shaped, they should be carefully painted to replicate the natural coloration and subtle variations in texture. Finally, they should be securely attached to the paws, ensuring they are properly positioned and aligned.
Claw Material Comparison
The choice of material for claws significantly impacts the final realism and durability of the piece. Below is a comparison of common materials:
| Material | Durability | Realism | Cost |
|---|---|---|---|
| Plastic Claws | High | Moderate | Low |
| Resin Claws | High | High | Moderate |
| Real Claws (from another animal) | High | High | High |
| Sculpted Claws (from clay or epoxy putty) | Moderate | High (with skill) | Low |
Final Conclusion
By mastering these seven essential finishing touches, you can elevate your taxidermy creations to a new level of realism and artistry. Remember, attention to detail is key; each subtle adjustment contributes to the overall impact and believability of your work. The journey to perfecting taxidermy is a continuous process of learning and refinement, and we hope this guide has provided you with valuable tools and inspiration to enhance your skills and create truly remarkable pieces.