Taxidermy and wildlife photography, while seemingly disparate disciplines, share a surprising number of interconnected skills. Both require a keen eye for detail, a deep understanding of animal anatomy, and a mastery of visual composition to create compelling and lifelike representations of the animal kingdom. This exploration delves into the ten key complementary skills, highlighting the surprising parallels between these artistic pursuits and showcasing how expertise in one can significantly enhance proficiency in the other.
From mastering principles of visual composition and lighting techniques to understanding animal anatomy and employing preservation methods, the journey reveals the interconnectedness of these fields. We will explore how skills honed in wildlife photography, such as capturing a fleeting moment and understanding depth of field, translate directly to the meticulous art of taxidermy, resulting in more lifelike and aesthetically pleasing mounts. The detailed examination of these shared skills offers valuable insights for both aspiring and experienced practitioners in either field.
Shared Artistic Skills

Both taxidermy and wildlife photography rely heavily on artistic skill to create compelling and realistic representations of animals. Understanding and applying principles of visual composition and aesthetics is crucial for success in both fields, resulting in pieces that are not only accurate but also visually engaging. The similarities extend beyond the basic principles; many specific techniques translate directly between the two disciplines.
Visual Composition in Taxidermy and Photography
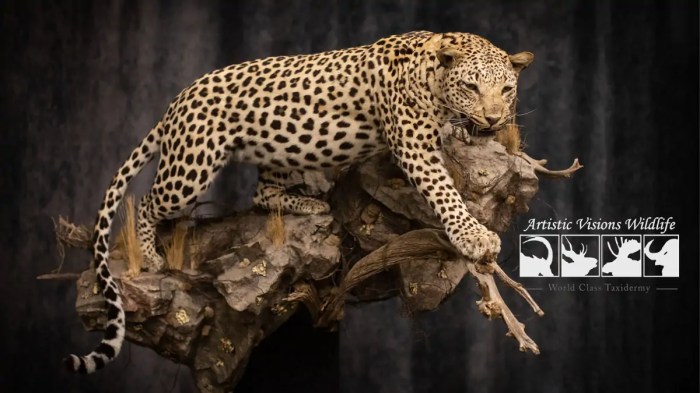
The rules of composition, such as the rule of thirds, leading lines, and negative space, are equally applicable to both photography and taxidermy. In photography, a well-composed image guides the viewer’s eye through the scene. Similarly, in taxidermy, the careful positioning of the animal within its mount, the angle of the head, and the use of background elements all contribute to a visually appealing and dynamic presentation. For example, a bird mount positioned slightly off-center, following the rule of thirds, creates a more natural and engaging pose than one rigidly centered. Likewise, using natural elements like branches or rocks to frame a deer mount can mimic the leading lines used effectively in landscape photography.
Lighting Techniques for Enhanced Presentation
Lighting is paramount in both photography and taxidermy. In wildlife photography, careful lighting can highlight texture, color, and detail, creating a three-dimensional effect. This translates directly to taxidermy, where strategically placed lighting can accentuate the form and features of the mounted animal. Think of the use of raking light in photography, which emphasizes texture and form by casting shadows. A similar effect can be achieved in taxidermy by using spotlights to highlight the musculature of a big game animal or the delicate feathers of a bird. Conversely, soft, diffused lighting can be used to create a more subtle and even illumination, mimicking the soft light of dawn or dusk often favored by wildlife photographers.
Color Theory in Taxidermy and Photography
Color theory plays a vital role in both fields. In wildlife photography, understanding color palettes and harmonies helps create visually appealing images. Similarly, in taxidermy, accurate color representation is essential for realism. Taxidermists must carefully match the colors of the artificial materials used in the mount to the natural hues of the animal. Understanding color temperature – the warmth or coolness of a color – is crucial in both. A photograph taken in the golden hour (sunrise or sunset) will have a warm color temperature, which can be mimicked in taxidermy through the careful selection of artificial fur or feathers with similar undertones. Conversely, the cool tones of a shady forest can be replicated in a taxidermy mount through the choice of appropriate materials. While artificial enhancements might be necessary, they should always aim for naturalism, maintaining a harmonious color palette.
Depth of Field in Photography and Dimension in Taxidermy
| Feature | Photography (Depth of Field) | Taxidermy (Depth and Dimension) | Comparison |
|---|---|---|---|
| Control | Adjusted through aperture settings; shallow depth of field isolates subject, large depth of field keeps background sharp. | Achieved through posing, sculpting, and material selection; detailed sculpting creates depth, while careful material choices enhance realism. | Both offer selective focus, highlighting key elements while potentially blurring less important areas. |
| Effect | Creates a sense of focus and separation between subject and background. | Creates a three-dimensional appearance and enhances the realism of the mount. | Both aim to draw the viewer’s attention to the main subject. |
| Technique | Controlled by the lens aperture and focusing distance. | Controlled by the skill of the taxidermist in posing, sculpting, and material application. | Both require a high level of skill and precision. |
| Outcome | An image with a specific focal point and a defined visual hierarchy. | A taxidermy mount that appears lifelike and three-dimensional. | Both aim for a visually stunning and realistic representation. |
Understanding Animal Anatomy & Pose
Accurately depicting animal anatomy is paramount in both taxidermy and wildlife photography. Success hinges on a deep understanding of the subject’s form, whether aiming for a lifelike mount or a captivating photograph. This section explores the similarities and differences in achieving anatomical accuracy across these two artistic disciplines.
Both taxidermy and wildlife photography rely on a thorough grasp of animal anatomy to create believable representations. However, their approaches differ significantly. Taxidermy demands a meticulous reconstruction of the animal’s form, manipulating skin and muscle to create a three-dimensional likeness. Wildlife photography, conversely, focuses on capturing the essence of the animal in its natural environment, relying on lighting, angle, and timing to emphasize form and structure. While taxidermy involves physically shaping the animal, photography relies on visual interpretation and manipulation through the camera lens and post-processing.
Comparative Methods for Depicting Animal Anatomy
Taxidermy utilizes a combination of skeletal structure reference, muscle memory (recreating muscle positions from anatomical knowledge), and careful skin manipulation to recreate an animal’s form. The taxidermist works with the animal’s existing structure, often using an armature or manikin to support the pose and shape. Wildlife photography, on the other hand, relies on observation and the ability to anticipate animal behavior to capture the most favorable pose and angle, using lighting to highlight musculature and form. Post-processing can further enhance the visual impact, but the foundation lies in the photographer’s skill in capturing the moment.
Creating Lifelike Poses in Taxidermy and Wildlife Photography
Creating a lifelike pose requires understanding the animal’s natural behavior and movement. In taxidermy, this involves posing the animal in a position that reflects its natural posture and gait. This often requires careful manipulation of the skin and underlying armature to achieve the desired pose. The process is informed by reference images and anatomical knowledge, ensuring the final pose is both aesthetically pleasing and biologically accurate. In wildlife photography, capturing a natural pose involves patience, observation, and understanding animal behavior. The photographer needs to anticipate the animal’s movements and be ready to capture the perfect moment, utilizing appropriate camera settings and lens choices to freeze the action and emphasize the animal’s form.
Techniques for Studying Animal Musculature and Skeletal Structure
A comprehensive understanding of animal musculature and skeletal structure is essential for both taxidermists and wildlife photographers. Study methods include anatomical charts, skeletal models, dissections (for taxidermists), and extensive observation of live animals in their natural habitat. Photographers can benefit from studying anatomical illustrations to understand how muscles and bones interact to create movement and posture. Taxidermists, however, need a more hands-on approach, often working directly with animal carcasses to understand the intricacies of their physical structure.
Anatomical Considerations for a Bird of Prey
Understanding the anatomy of a bird of prey is crucial for both accurate taxidermy mounting and compelling wildlife photography.
- Taxidermy: Accurate placement of the wing feathers, the proper curvature of the neck, and the positioning of the talons are essential for a realistic pose. The delicate structure of the skull and beak requires special care. The positioning of the leg muscles to reflect the bird’s stance is critical for a natural appearance.
- Wildlife Photography: Capturing the bird in flight requires a fast shutter speed and understanding of its aerodynamic movements. High-quality lenses are necessary to capture the intricate detail of its feathers and the power of its muscles. Knowing the bird’s hunting behavior can lead to opportunities to photograph it in dynamic poses, such as while perched or hunting.
Preservation & Presentation Techniques

Both taxidermy and wildlife photography share a fundamental goal: to preserve a moment in time, albeit through vastly different methods. Taxidermy strives to immortalize the physical form of an animal, meticulously recreating its lifelike appearance for lasting appreciation. Wildlife photography, on the other hand, captures a fleeting instant in the animal’s life, preserving its behavior and environment in a single frame. Both disciplines demand a deep understanding of the subject, meticulous attention to detail, and a commitment to artistic expression.
The parallels extend to the artistry involved. Just as a photographer carefully composes a shot to highlight the beauty and character of their subject, a taxidermist meticulously positions and poses the animal to showcase its unique features. Both professions require a keen eye for detail and an understanding of form and composition.
Photographic Techniques in Taxidermy Presentation
Different photographic techniques can dramatically enhance the presentation of taxidermied animals. Macro photography allows for extreme close-ups, revealing the intricate detail of fur, feathers, or scales, showcasing the taxidermist’s skill in recreating textures and patterns. Wide-angle shots can capture the animal within its display environment, providing context and highlighting the overall artistry of the piece. Using selective focus, a photographer can draw attention to specific details while subtly blurring the background, creating a visually appealing and impactful image. For example, a macro shot of a taxidermied bird’s eye might highlight the painstakingly recreated detail of each feather, while a wide-angle shot might show the bird perched on a realistically crafted branch within a diorama setting.
Material and Process Comparison
Taxidermy and wildlife photography employ distinct materials and processes, yet both rely on specialized tools and techniques. Taxidermy utilizes a range of materials, including tanning solutions, artificial eyes, wires, and fillers to reconstruct the animal’s form. The process involves meticulous skinning, cleaning, and shaping, followed by mounting and posing the animal. Wildlife photography, conversely, relies on sophisticated cameras, lenses, and lighting equipment. The process involves careful observation, patient waiting, and precise adjustments to camera settings to capture the desired image. Both disciplines require significant expertise and practice to master. A taxidermist’s tools might include scalpels, tanning agents, and mounting forms, while a wildlife photographer uses cameras, telephoto lenses, tripods, and potentially specialized lighting equipment.
Descriptive Caption Example
Creating a compelling caption is crucial for showcasing the artistic merit of a taxidermied animal. The caption should go beyond simply identifying the species; it should highlight the unique features of the piece and the taxidermist’s skill.
This magnificent specimen of a Red Fox (Vulpes vulpes) showcases the exceptional artistry of taxidermist John Smith. Note the lifelike rendering of the fur’s texture and the meticulously recreated expression in the fox’s eyes. The pose, capturing a moment of alert stillness, is a testament to Smith’s understanding of animal anatomy and his dedication to preserving the natural beauty of this creature.
Closure

Ultimately, the synergy between taxidermy and wildlife photography reveals a fascinating intersection of art and science. By understanding and applying the shared principles of visual composition, anatomical accuracy, and preservation techniques, practitioners in both fields can elevate their work to new levels of artistry and realism. The ability to translate skills from one discipline to another not only enhances the quality of the final product but also deepens the appreciation for the beauty and complexity of the natural world.